🎯 Level up your VR game with precision and style!
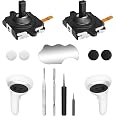
The OLCLSS Joystick Replacement Kit for Oculus Quest 2/3 offers a professional-grade repair solution featuring 2 high-quality 3D thumbsticks, 4 silicone thumbstick caps, and a comprehensive toolkit including T5 screwdrivers, tweezers, and pry tools. Engineered with upgraded internal springs and conductive cables, this 3rd generation joystick kit ensures enhanced durability and smoother gameplay, making it the ultimate DIY fix to extend your Meta Quest controller’s lifespan.


| Brand | OLCLSS |
| Item model number | meta quest 2 controller repair kit |
| Hardware Platform | playstation vr, xbox one |
| Operating System | Oculus Quest 2 Controller, oculus quest 2 controller |
| Item Weight | 1.44 ounces |
| Package Dimensions | 5.83 x 3.82 x 1.34 inches |
| Color | Black-11-in-1 |
| Power Source | Wireless |
| Manufacturer | OLCLSS |
| ASIN | B0BFPTFT67 |
| Date First Available | November 18, 2020 |
B**R
Fixes glitchy stick drift issue! Works great!
Put this in my kids Quest 2 controller to replace the old glitchy one - this product fixes the stick drift. Way cheaper than buying a whole refurbished controller from Meta, and it works like new again! Though I used my own tools during the repair simply because it was easier, this kit does come with all the tools you need. Find your favorite YouTube instructor and follow along. It's not too difficult with a little patience. :) Be sure to calibrate afterwards if needed.
C**R
Stick Drift Fixed
This fixed my problem. I was having major stick drift issues but after installing, I ran it for a while on heavy moving games and it works great. It is slightly difficult to replace (not hard) but difficult. It's small parts but everything fit well and they gave you all the tools you need. Just look up a youtube video of someone fixing it (that's what I did) and it's fairly straightforward. Plenty of screws but WAY cheaper than buying a new controller. It took me about an hour to complete. Great value for what it is.
L**E
Small parts but doable
The kit gives you everything you need, but you need to have a lot of patience. I had to take it apart fully twice because I seated the joystick wrong the first attempt. It took a good hour to take apart and put together the first time. Mainly because I was trying to be super careful and not break any of the plastic. The second attempt I had it apart and back together in roughly 20 minutes. Just make a layout of where all the screws go, especially the ones under the black cover that covers the buttons, because the length on them varies.I actually got two joysticks and accidentally damaged the ribbon on one on the first attempt but luckily the kit I got comes with two replacements. If you have it seated right though they pop right in. When taking it apart make sure you don't pop any of the other ribbons out of place. One of the ends of the ribbons on the ring popped out on one side and I had to reseat that, but it wasn't too difficult. Just be mindful of those, you'll see the ends connect to the board on each side under the trigger button. It's easy to jar that one loose just a little bit.I'm not sure what the metal pad tool is used for other than sitting there looking shiny on your work area. I really only needed the pry tool to help pop things apart, the large t5 screwdriver, and the tweezers. The tweezers help placing the screws in place and can be used to very carefully line up the end of the ribbon. Don't damage the ribbon out of frustration with the tweezers like I did! When putting the ribbon in, there's a really tiny black retainer clip on the top of the ribbon housing where it connects. It's super tiny and really hard to see if you don't have quite 20/20 vision. I flipped that up to insert the ribbon then flipped it back down to lock the ribbon in.The new joystick seems to work really well and the kiddo is happy there's no longer any drift.
R**U
They Work
They work well. Fits like the original. Process was a bit difficult, but follow the iFixIt tutorial for replacing the sticks on your controllers and you'll be okay. Minus 1 star because the kit does not come with any replacement adhesive unfortunately. Much cheaper than buying a new controller (nearly 1/20 of the price). I recommend fixing them yourself with a kit like this.
J**H
Easy install and stick drift GONE!
The best replacement joysticks to buy they work perfectly like original , And all the stick drift GONE fixes the problem And you could watch tutorials on yt its not that hard to install
Z**R
Both did not work out of packaging
When replacing the joystick I needed, I successfully replaced it with no issues.However when I go to play a game, the joystick is stuck moving left. If I move it all the way to the right, the calibration is dead center. And then, when I replaced the first new joystick with the second packaged one, it worked for maybe a week before it refused to register forward.Straight from the packaging and there’s already issues with the sensors. Absolutely terrible, please don’t waste your money on these dumpster worthy products.
ترست بايلوت
منذ يوم واحد
منذ 3 أسابيع
منذ أسبوع
منذ شهر